Stone-Age Guide
Contents
Welcome to TerraFirmaCraft!
The following guide will help you get started playing this survival-overhaul Minecraft mod. This guide has been written with the expectations that the reader has a basic understanding of vanilla Minecraft mechanics. It will focus on aspects of the game that are different with TerraFirmaCraft, as well as a few tips and tricks for easier starting gameplay. Throughout the guide, the text will contain links to individual wiki pages for learning more information about that particular topic.
Important Differences
There are a few key differences when playing TerraFirmaCraft from vanilla Minecraft that are important to understand from the very beginning.
Health
![]()
Instead of hearts, health is represented with a red bar. When you first spawn, you will have a maximum health value of 1,000 HP. This value will increase and decrease depending on your nutrition and experience levels. Health regenerates very slowly over time, as long as your hunger bar is at least 25% filled. Mob health is also increased, although not proportionally; creepers for instance have much less health relative to the player than in vanilla.
Hunger
![]()
Instead of shanks of food, hunger is represented with a green bar. Rather than arbitrary filling values, the hunger system in TerraFirmaCraft is based off of food weight. TerraFirmaCraft uses the imperial measurement of ounces. However, this measurement does not relate to any other measurement in the game, so if the concept of ounces confuses you, you are welcome to instead think of them as generic "food units" or "bites." Each stack of food in TerraFirmaCraft can weigh up to 160 ounces.
Players have a stomach capacity of 24 oz. When eating almost any food, the player can consume a maximum of 5 oz at a time. The exception to this is sandwiches, which can be eaten in a single bite. It is impossible to over-eat in TerraFirmaCraft, meaning that you will only consume enough ounces to fill your stomach to the 24 oz capacity. The only way for you to gain saturation and therefore eat less often is to create salads and sandwiches.
Unlike vanilla, the hunger bar does slowly deplete over time even while you are standing still, or even sleeping. In addition to the slow continuous drain, hunger is primarily depleted by performing actions such as breaking blocks or attacking. If you sleep through the night, your hunger bar will deplete half as much as if you had been awake the entire time.
It is important to note that it is not possible to starve to death in TerraFirmaCraft. When your hunger bar reaches below 25%, you will get Mining Fatigue II and Weakness II potion effects. When your hunger bar is completely empty, your nutrition levels will drain at three times the normal rate, therefore quickly decreasing your max health. However, once all of your nutrition categories are completely empty, you will still have a maximum HP of 50. Note that 50 HP is a small enough value that taking damage from any outside source such as hostile mobs or fall damage will very likely kill you.
Thirst

![]()
Thirst is represented with a blue bar. The thirst bar, like the hunger bar, slowly depletes over time even while you do not move. The thirst bar is replenished by drinking fresh water, which is easily distinguished from saltwater by the presence of cattails and pondweed. Starting out, you will drink the water directly from the pool by using ![]() Right Click with an empty hand on the face of a block that is exposed to the water. A slurping sound will play, and your thirst bar will increase slightly. You can simply hold
Right Click with an empty hand on the face of a block that is exposed to the water. A slurping sound will play, and your thirst bar will increase slightly. You can simply hold ![]() Right Click to continue drinking until you are no longer thirsty. Once you have created a ceramic jug you will be able to fill it with fresh water to drink. Ceramic jugs replenish much more of the thirst bar than drinking directly from the pond, and offer a way for you to be able to drink even when no fresh water is nearby. It is important to note that ceramic jugs are not indestructible, and there is a random chance that it will break each time you take a drink.
Right Click to continue drinking until you are no longer thirsty. Once you have created a ceramic jug you will be able to fill it with fresh water to drink. Ceramic jugs replenish much more of the thirst bar than drinking directly from the pond, and offer a way for you to be able to drink even when no fresh water is nearby. It is important to note that ceramic jugs are not indestructible, and there is a random chance that it will break each time you take a drink.
Thirst is primarily depleted by sprinting and jumping. If you sleep through the night, the thirst bar will deplete half as much as if you had been awake the entire time. When the thirst bar is half empty, you will no longer be able to sprint. When there is only 25% of the bar left, you will get an invisible Slowness II potion effect until the thirst bar is replenished. If the thirst bar is completely empty, the current ambient temperature is above 35, and you are directly exposed to the sky, you will take damage simulating a heat stroke.
Experience
The experience system represents life experience, and so each level increases a player's maximum health, thirst, and alcohol tolerance, allowing them to take more hits, survive longer without drinking fresh water, and drink more alcohol before getting negative side effects.
Unlike vanilla, there is no enchanting or tool repairs to consume experience levels, so the only way to decrease your experience level is death.
Punching Wood
The tech-tree in TerraFirmaCraft is a complete overhaul of the vanilla progression system. There are no such thing as wooden tools in TerraFirmaCraft, with your first tools being made of stone. This means that you should not waste your time punching trees, as doing so will take a very long time to break the block, and will give you absolutely nothing in return.
Gravity
In addition to sand and gravel, dirt, grass and cobblestone are also affected by gravity in TerraFirmaCraft. Unlike in vanilla, gravity-affected blocks are able to fall sideways in addition to straight down. This means that without a proper support system, you will not be able to create walls or ceilings out of these blocks.
Mob Spawning
TerraFirmaCraft implements a hostile mob spawn protection system that prevents mobs from spawning in areas that you have spent a fair amount of time in. Areas with this hostile mob spawn protection will not spawn hostile mobs regardless of the current light level. With the removal of the light-level dependency for mob spawning, TerraFirmaCraft has also implemented the ability for torches to burn out.
Livestock in TerraFirmaCraft, including cows, chickens, pigs, sheep, and horses only spawn on initial chunk generation. These animals do not despawn and will not respawn after they have been killed.
Wild animals such as bears, pheasants, deer, squid, fish and untamed wolves can despawn and have the possibility to respawn using the vanilla friendly mob respawn mechanic.
Combat
At the very beginning of the game, your best chance at surviving combat is if you avoid combat entirely, hiding and running away from any and all hostile mobs you come across. If you find yourself caught in a combat situation that you cannot escape, it is important to know that TerraFirmaCraft has implemented different damage types. Different weapons will do different types of damage, and certain mobs can be stronger or weaker against a specific damage type. For every mob except for skeletons, your best stone-age weapons are the axe and the javelin. Knives can also be used as a melee weapon, but don't deal much damage.
Tip: For both standard and javelin skeletons, your most effective stone-age weapon is a hammer. Skeletons are completely immune to piercing damage, meaning that all ranged weapons are useless against them.
If you get lucky and kill a skeleton that drops a bow, you can craft arrows using rocks, sticks and feathers. Arrows can be stored in a quiver or in your inventory. Bows cannot be crafted in the stone age.
| |
| ||
| | |||
| |
| ||
| |
Crafting
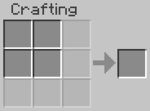
Just like in vanilla, you will start out with a 2x2 crafting grid in your inventory. However, as you can see there are additional greyed out slots showing that it is possible to expand this grid to the full 3x3. The crafting grid is expanded by making a crafting table with four planks, just like in vanilla. Doing so will consume the table, and your inventory crafting grid will be permanently expanded until you die.
Tip: This is the only way to expand your crafting grid, and that making additional crafting tables is useless, as they cannot be used to access the interface when placed, and they cannot be consumed for expanding the grid after creation.
The planks required for making a crafting table are made with metal tools, so you will not be able to expand your crafting grid while you are in the stone age.
Climate & Seasons
Instead of traditional biomes, TerraFirmaCraft uses a climate system including rainfall, temperature, and evapotranspiration to determine where animals spawn, and what trees, crops, and other plant life grows in an area.
There is also an in-game calendar complete with different seasons throughout the year. The game will always start in the year 1,000 on June 1st. Players will always spawn in the northern half of the map, so the starting season is early summer. Crossing the equator of Z = 0 will reverse the seasons to mimic earth's southern hemisphere.
Gathering Materials
Now that you understand some of the key differences between vanilla Minecraft and TerraFirmaCraft, let's move on to actual gameplay. The first thing you'll want to do is explore your world and gather materials.
Rocks and Ore
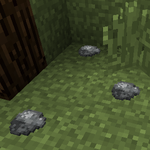
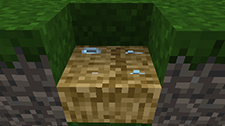
Laying scattered on the ground you will find pieces of rocks and ore. All you need to worry about starting out is gathering the rocks by either breaking the block, or using ![]() Right Click on it. The small pieces of ore indicate that there is a vein of that ore nearby underground, so it is important to take note of its location for when you later have a pickaxe and are ready to mine.
Right Click on it. The small pieces of ore indicate that there is a vein of that ore nearby underground, so it is important to take note of its location for when you later have a pickaxe and are ready to mine.
Tip: Once a piece of ore or rock has been picked up from the ground, it cannot be placed back down, so only gather what you need to save on inventory space. A single stack of up to 64 rocks will be more than sufficient for your first few in-game days.
Sticks and Saplings
Similar to rocks and ores, sticks can be found laying on the ground underneath trees, or in beach and river biomes. You can also punch leaves which will have a chance to drop sticks and saplings when broken. It does not matter if you use your fist or a stone tool to break the leaves, the drop rate will be the same.
Tip: When a tree is chopped down, all leaves instantly despawn with it and they will not drop any sticks or saplings.
Food
While it is not possible to directly starve to death in TerraFirmaCraft, gathering food is still an important aspect to increase your chances of staying alive. Food does decay in TerraFirmaCraft, so it is important to periodically trim the decay off of the food so it doesn't rot as quickly. This can be done by either crafting the food with a knife, or having a knife in your inventory, and while looking at your crafting grid pressing the D key. Pressing the hotkey will attempt to trim the decay off of all food in your inventory, consuming knife durability for each piece of food.
Rather than the traditional stack system, food in TerraFirmaCraft is grouped together by weight. A single inventory slot can hold a stack of up to 160 ounces of food. Hovering over a single food item in your crafting inventory and pressing S will combine all of that specific food item into stacks of larger weight. Multiple key presses may be required for larger quantities of individual stacks. Alternatively, multiple pieces of food that are underneath the maximum weight can be crafted together to create a single piece of food of the combined weight. If a piece of food that has no decay is crafted with a knife, it will be cut in half. This is useful for sharing food with multiple players, splitting food into smaller pieces to store in vessels, and splitting food into exact sizes for use in barrel processing.
Tip: Holding ⇧ Shift while cutting food in half will result in multiple pieces of food, with each one half the weight of the one before it.
Agriculture

Crops spawn randomly in the wild between the seasons of spring and late summer, and have a chance to regenerate during those seasons every year. Breaking a wild crop will give only seeds if it isn't fully mature, so you should wait until it has reached the last stage of growth before harvesting if you want food. Crop growth in TerraFirmaCraft is based off of how much time has passed since the crop was planted as well as some other factors, with many crops taking a few in-game months to reach maturity. It is possible for crops to freeze to death during the colder seasons.
Tip: You will always start a new world in the beginning of summer, so some of the seeds you gather during the first year likely will not reach maturity before freezing to death if they are planted before spring of the next year.
Animal Husbandry
The amount of meat that you get from killing animals is based on your butchery skill, so the first animals that you kill will drop very little meat. With each kill your butchery skill will increase, dropping more meat than the last.
When killing animals for food, it is important to leave at least a breeding pair of one male and one female of any animals you come across that can be domesticated, as they will not respawn if you kill them. TerraFirmaCraft implements a familiarity system for interacting with animals, and most animals have a very long gestation period before giving birth, so it is unlikely to breed any babies before your first year or two in-game.
You are welcome to freely kill any wild animals which cannot be domesticated that you come across, as they will eventually respawn.
Tip: The vanilla respawn mechanic of friendly mobs does not spawn new animals very often, and that any meat you do get from killing animals will start to decay, so it is better to keep the animal alive until you actually need the meat.
Fruit Trees and Berry Bushes

Fruit trees and berry bushes can be found scattered across the world in areas of warmer climate. Each type of tree and bush will only be ripe during specific seasons, and will not provide food for the rest of the year. Fruit trees are a renewable resource, providing saplings when their branches are broken with an axe. Berry bushes are not renewable, and the bushes that you find while out exploring are the only ones that you can get. Berry bushes can be broken and replanted elsewhere.
Seaweed
Seaweed can be found growing in salt water. Seaweed blocks can very quickly be broken with a knife, giving 2 to 7 ounces of edible seaweed. Harvested seaweed will not grow back.
Fish and Squid
You are unable to craft a fishing rod while in the stone age, but it is still possible to get food from TerraFirmaCraft's water animals. Fish can be found swimming in lake biomes, and squid can be found swimming in saltwater. Both animals can be directly attacked using melee weapons or a javelin, and will drop food. The amount of food you get is once again dependent on your butchery skill, so you will not get much food at all from these small animals. Even with a high butchery skill, the amount of food dropped from these animals is fairly small.
Tip: Since both fish and squid respawn, killing them is a quick and easy way to increase your butchery skill, so you will get more meat from killing larger animals.
Clay

Clay generates in areas with a rainfall value of at least 500, meaning that it cannot be found in areas covered with dry grass. Clay deposits range from four to thirty blocks wide, and two to six blocks deep, and will be marked by goldenrod flowers. Breaking the clay block will yield one to three clay items.
Tip: A shovel is not required for harvesting clay, but will make the process faster.
Straw
Straw can be obtained by breaking tall or short grass with a knife, yielding a single piece of straw per block. Straw is also produced as a byproduct when refining grains.
Tip: Tall grass will slowly grow back during warmer weather under the right conditions.
Logs
Logs are gathered by chopping down trees with an axe. If you use your axe to break the bottom log of the tree, it will chop the entire tree down. If your axe does not have enough durability to fell the entire tree, as many logs as possible starting from the top of the tree will be chopped and the axe will break. It is important to note that while you are using a stone axe, each log block only has a 90% chance of dropping a log when broken.
Tip: Trees of the same type that are close together will act as one combined tree and both will fall when breaking one of the bottom log blocks.
Your First Tools
There are a few basic tools and weapons that you will be using while in the stone-age. Once you've gathered some rocks and sticks, you'll be able to make some basic tools so you can gather rest of the above listed materials.
Tip: Tools cannot be crafted together for repair in TerraFirmaCraft, so it is encouraged to just use each tool until it breaks.
Knapping
Knapping is the process of using two rocks to create heads for stone tools. ![]() Right Click while holding a stack of two or more rocks to open the knapping interface.
Right Click while holding a stack of two or more rocks to open the knapping interface.
| |
||||||
The interface is broken up into a 5x5 grid. Clicking on each square of the grid will remove the image of the stone, chipping the rock into the desired shape. Once a piece of the rock has been removed, it cannot be put back, so be careful where you click. Whether you achieve the desired shape or not, one of your rocks will be consumed in the process. If you successfully create a specific shape, a tool head will appear to the right which can then be attached to a stick or a bone in the crafting grid to create a stone tool.
| |
| ||
| | |||
| | |||
Tip: Completed stone tools do not stack, but tool heads will stack up to 32. At night when you are hiding from monsters, you can knap a handful of each tool head to keep in your inventory. Then during the day when your tool breaks, you can quickly combine another head with a stick or bone for a new tool.
With the exception of stone hammers and stone knives, some types of rocks will result in slightly more durable and/or efficient tools than others. This is not immediately apparent, as all stone tool icons look the same. In order of increasing durability and efficiency: Sedimentary, Metamorphic, Igneous Intrusive, Igneous Extrusive. Note however that there is only a difference of 20 uses between the highest and lowest durability stone tools, and the difference in efficiency is barely noticeable.
Tip: Some of the tools can be knapped out differently than the below forms, feel free to experiment.
Axe
Axes are used to chop down trees, and acquire fruit tree saplings. Stone axes only have about a 90% chance of dropping a log item for each log block.
While the axe is not technically a weapon, it can be used to deal slashing damage at the cost of using twice the durability per hit.
|
|
Hammer
In the stone-age, hammers are used to smash flux-stone and borax to create flux, and to break logs, yielding 1-3 sticks.
While the hammer is not technically a weapon, it can be used to deal crushing damage at the cost of using twice the durability per hit, making it the only stone-age tool that is effective against skeletons.
|
|
Hoe
In the stone-age, hoes can be used to turn grass or dirt into farmland, as well as check the water levels of the farmland, and the harvest state of growing crops. The mode of the hoe can be changed by pressing the Cycle Tool Mold key (Default:M), while having the hoe equipped.
![]() < Mode Indicator
< Mode Indicator
![]() Preparation - Standard use, tilling soil into farm-plot.
Preparation - Standard use, tilling soil into farm-plot.
![]() Water - Highlights the target farmland with black: no water access, and blue: water access.
Water - Highlights the target farmland with black: no water access, and blue: water access.
![]() Harvest - Highlights the farmland with a green display for finished crops and red for those whom are still growing into maturity.
Harvest - Highlights the farmland with a green display for finished crops and red for those whom are still growing into maturity.
|
|
Tip: Till grass blocks to get farmland plots will full nutrients. If you till a dirt block, it will have no nutrients and must lay fallow for a while before you can grow anything on it.
Javelin
Javelins can be used as a melee weapon, but they are more effectively used as a throwing spear. Hold ![]() Right Click with a javelin to draw it like a bow, releasing to fire. Javelins deal piercing damage and pass through enemies so they can be recovered by picking them up off the block it was stuck into. Javelins will only take durability damage when they hit an entity. If you miss your target, no durability is lost. A javelin with low enough durability will break when hitting an entity.
Right Click with a javelin to draw it like a bow, releasing to fire. Javelins deal piercing damage and pass through enemies so they can be recovered by picking them up off the block it was stuck into. Javelins will only take durability damage when they hit an entity. If you miss your target, no durability is lost. A javelin with low enough durability will break when hitting an entity.
You can store your javelins in a quiver, or just in your inventory. When throwing a javelin, the slot will refill with another javelin if you have one.
|
|
Tip: Javelins are completely useless against skeletons, so don't bother trying to use them when you are fighting one.
Knife
Knives can be used as a weak melee weapon inflicting piercing damage, though their best use is in a crafting table to remove decay, process cereal crops, cut food into smaller pieces, and scrape sheepskin. Knives are also used to collect straw from tall and short grass, to create a meal prep area, to shear sheep, scrape soaked hides, and to open the leatherworking interface.
|
|
Tip: If you mess up the double knife knapping pattern, you can still get a single knife blade by just doing one half of the pattern.
Shovel
Shovels are used to harvest blocks of dirt, clay, gravel, and sand faster. They are also required to harvest charcoal from a charcoal pit.
|
|
Firepit
At the end of the first day, you will probably want to create a firepit to make some torches, and cook any meat you've collected so you can eat it. You'll need at least five sticks, some logs to use as fuel, and optionally a piece of straw. First you'll need to put two sticks in the grafting grid in a diagonal pattern to make a firestarter.
| |
| ||
| | |||
| |
|||
Once you have a firestarter, throw (Default: Q) three sticks on the ground or other non-flammable block so they are stacked together on the same block. Then with the firestarter in your hand target the block that the sticks are resting on and hold right-click. The firestarter will draw back and play a sound, simulating rubbing the two sticks together. It's possible that your first few tries will not be successful, and you may even have to make another firestarter, but you can throw a piece of straw in with the stack of sticks to increase your chances of it successfully lighting. Once the firepit appears, drop some logs on to it to quickly add fuel. You can ![]() Right Click on the firepit as long as you aren't holding a firestarter or flint & steel to open its interface. If the firepit goes out, you'll need to add some fuel and then
Right Click on the firepit as long as you aren't holding a firestarter or flint & steel to open its interface. If the firepit goes out, you'll need to add some fuel and then ![]() Right Click on it with a firestarter to relight it. Relighting is instant, so don't worry when the drawing animation doesn't play.
Right Click on it with a firestarter to relight it. Relighting is instant, so don't worry when the drawing animation doesn't play.
Tip: Rain or snow falling directly on a firepit will prevent you from lighting it and will extinguish a lit firepit. To avoid this, make your firepit below some tree-branches or a stone outcropping, where it will be protected from the rain.
If you get lucky enough to kill a zombie that drops a wrought iron ingot, you can combine it with a piece of flint in the crafting grid to create a flint and steel that will always create a firepit on the first try, and has much more durability.
| |
| ||
| | |||
| | |||
| |
Torches
Once you have your first firepit, you'll be able to create some torches to light up the area around you. Simply put a stick in a firepit to get two torches. Note that you can only put the sticks in the firepit one at a time. Alternatively, once you've created some torches you can place one and ![]() Right Click it with a stick in your hand for quicker torch creation at the expense of only getting one torch per stick.
Right Click it with a stick in your hand for quicker torch creation at the expense of only getting one torch per stick.
| |
|
||||||
| |
|||||||
| |
|||||||
| |
|||||||
| |
|||||||
| |
|||||||
| |
|||||||
It's important to note that after a configurable amount of time (Default: 48 in-game hours), or if directly exposed to rain or snow, lit torches will burn out and no longer produce light. You can also manually extinguish a torch with a ![]() Right Click from an empty hand. Torches in your inventory will never burn out, and can be used to
Right Click from an empty hand. Torches in your inventory will never burn out, and can be used to ![]() Right Click on placed torches to either relight burned out torches, or restart the countdown timer on lit torches.
Right Click on placed torches to either relight burned out torches, or restart the countdown timer on lit torches.
Pottery
Once you've gathered some clay, straw, and logs, you can start to make various pieces of pottery. ![]() Right Click while holding a stack of five or more pieces of clay to open the clay-forming interface.
Right Click while holding a stack of five or more pieces of clay to open the clay-forming interface.
| |
||||||
The interface is broken up into a 5x5 grid. Clicking on each square of the grid will change the image of the clay, forming into the desired shape. Once a piece of the clay has been changed, it cannot be changed back, so be careful where you click. Whether you achieve the desired shape or not, all five clay will be consumed in the process. If you successfully create a specific shape, a piece of pottery will appear to the right which can then be fired in a pit kiln.
In order to create a pit kiln, you must first place the pottery in a 1-deep hole by holding it in your hand and using ![]() Right Click on the top of the block. You can place up to four small items or one large vessel in this manner. Then
Right Click on the top of the block. You can place up to four small items or one large vessel in this manner. Then ![]() Right Click with eight pieces of straw, followed by eight logs and light the kiln using either a firestarter, a flint & steel, or by dropping a torch on the block. Once the fire finishes burning, you will be able to collect your ceramic items the same way you placed them down, or by simply breaking the block to collect all of them at once.
Right Click with eight pieces of straw, followed by eight logs and light the kiln using either a firestarter, a flint & steel, or by dropping a torch on the block. Once the fire finishes burning, you will be able to collect your ceramic items the same way you placed them down, or by simply breaking the block to collect all of them at once.
Important: The pit kiln will not work as pictured below. These images are in cross section, with the required surrounding blocks removed for visibility.
Items
Straw
Logs


Tip: The fire from a pit kiln will light nearby flammable blocks on fire. For this reason, it is advised not to light pit kilns near wood, thatch, or other flammable blocks. Pit kilns will not be put out by rain, so you do not need to worry about putting them under a roof.
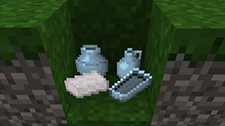
Ceramic Jug
Ceramic Jugs are used to carry water. They can be filled with ![]() Right Click on a source block of fresh water, or on a large vessel that contains at least 1,000 mB of fresh water. Flowing water, salt water, and water from hot springs will not work. You can drink from a jug of water by holding down
Right Click on a source block of fresh water, or on a large vessel that contains at least 1,000 mB of fresh water. Flowing water, salt water, and water from hot springs will not work. You can drink from a jug of water by holding down ![]() Right Click, the same as you would when eating food. Drinking will replenish three bars of thirst and completely empty the jug.
Right Click, the same as you would when eating food. Drinking will replenish three bars of thirst and completely empty the jug.
Tip: There is a very small chance that the jug will break when you drink from it, so it is a good idea to make sure you always have a few around.
If you ![]() Right Click an empty ceramic jug, you will blow into it and play a note. The pitch of the note played is dependent on the direction up or down you are currently looking.
Right Click an empty ceramic jug, you will blow into it and play a note. The pitch of the note played is dependent on the direction up or down you are currently looking.
|
| |||||||||||||||||||||||||||||||||||||||
Ceramic Vessel
Ceramic Vessels are a very versatile item, but in the stone-age you will simply use them for basic storage. You can use a ceramic vessel to store up to four stacks of items. However, ceramic vessels are only able to store items with a size of small, very small, or tiny. The size of every item in your inventory is displayed on the tooltip when you place your cursor over it.
To place items into a vessel, ![]() Right Click with the vessel in hand to open up the interface. A ceramic vessel with items in it can still be stored in your inventory, or placed on the ground, thereby providing increased storage capacity.
Right Click with the vessel in hand to open up the interface. A ceramic vessel with items in it can still be stored in your inventory, or placed on the ground, thereby providing increased storage capacity.
Tip: Food stored inside of a vessel will decay at 50% the normal rate. However, the food must have a weight of no more than 80 oz in order to fit in the vessel's small slots.
|
| |||||||||||||||||||||||||||||||||||||||
Large Vessel
Large Vessels are a lower tier version of barrels. As you are unable to make a wooden bucket in the stone age, you will only be able to fill the large vessel with liquid by either using it like a bucket on a source block of salt or fresh water, or by leaving it unsealed and exposed to the sky while it is raining to slowly fill it with fresh water.
Once sealed, a large vessel can be broken and moved around. It will keep its contents so that you can fill it in one location before moving it to another. If the large vessel is not sealed when it is broken, it will dump its items onto the ground, and the liquid inside will be deleted. Sealed large vessels must be carried one at a time in your back slot (located to the right of the chest armor slot). If you have a sealed large vessel in your inventory that is not located in the back slot, you will see a message stating, "Overburdened" and will not be able to move.
Large vessels can do all the same processing recipes as barrels, with the exception of creating alcohol or vinegar. While the large vessel can be used to make cheese, you will not be able to do so while in the stone-age because you cannot make the wooden bucket for collecting milk from a cow.
Alternatively, large vessels have nine slots for storage of items and blocks, and can hold anything that has a size of medium or smaller. They can be placed on the ground and used in a manner similar to chests, or they can be sealed and carried on your back to indirectly expand your inventory's capacity.
Tip: Unlike the other pottery items, unfired large ceramic vessels will take up the entire block and can only be fired one at a time.
|
| |||||||||||||||||||||||||||||||||||||||
Bowls
Ceramic Bowls are used in the creation of salads as well as to craft a gold pan. When eating a salad, the bowl is destroyed, so it is a good idea to make a lot of bowls if you plan on eating salads.
|
| |||||||||||||||||||||||||||||||||||||||
Shelter
Once you have gathered materials and created your first tools, you will probably want to start working on some form of shelter. Since you cannot mine stone blocks at this stage you need to either find a cave or build a primitive shelter. Putting up some cobblestone blocks as the base of temporary walls might be a good extra protection in the early days, just remember that once you've placed a block of cobblestone you won't be able to break it until you have metals tools, so place them only where you need them (building near a cliff-face or on a hill may help you in designing early defenses). You can break a cobblestone block with just your fist, but it will take an extremely long time to do so, and you will get nothing in return.
Tip: Cobblestone falls sideways just like dirt, so it can't be used to make tall, 1 thick walls without proper support.
Logs and Log Piles
The logs you get from chopping down trees with an axe can be used to build both the walls and roof of a structure similar to a log cabin. You can also stack logs into log-piles by sneaking (Default: ⇧ Shift) while placing the log. Log piles can be used for walls, and have the advantage of being very fast to break. However, log piles can only be placed on top of solid blocks, or a completely filled log pile, so it will take a lot more logs to create a wall out of log piles, and it would be very difficult to use log piles to create a ceiling.
Thatch
Thatch is one of the earliest roofing blocks available in the game. Unlike dirt and cobblestone, thatch is not affected by gravity so you can use it to create a roof for your shelter. Thatch has an advantage over logs in that it can quickly and easily be removed by hand.
| |
|
| |
| | |||
| |
| ||
Note: Players and mobs are able to move through thatch, making the block essentially useless for walls that do not contain at least one other material. You also cannot use thatch to pillar up to safety, as you will simply fall through the block when you try to jump on it. Hostile mobs will not be able to spot you if you are already hiding in a thatch enclosure, but they are able to follow you through thatch if they have been aggro'd while you were outside of the thatch.
Tip: Thatch is also extremely flammable, and any thatch structures that are built near an open flame such as a pit kiln will quickly burn to the ground.
Beds

While you won't be able to sleep through the night during the stone-age, you are able to create a primitive bed that can be used to set your spawn point. You can make a straw & hide bed by placing two thatch blocks next to each other on the ground, and then using a large raw hide to ![]() Right Click on the thatch and create a bed.
Right Click on the thatch and create a bed.
Leaving the Stone Age
Eventually you will probably want to progress out of the stone-age, and create some metal tools. In order to do this, you'll need to find some ore.
To make your first metal tool head you will need to collect 10 pieces of small, copper-bearing ore:
| Copper Ore | ||
|---|---|---|
Prospecting
There are currently two stone-age methods of gathering ore. You can either collect them from the ground in the same manner that you gathered rocks and sticks, or by using a Gold Pan.
Tip: Ore that is found laying on the ground indicates that there is a vein of that ore nearby, so you should always mark the location after picking up the ore piece so you can come back and find the vein once you have a pickaxe.
Processing
For more information on how to process ore and leave the stone-age, please read the Metalworking Guide.
| Navigation | |
|---|---|
| Construction | Barrels • Blueprints • Bricks • Firepit • Plank Blocks • Protection Meter • Quern • Smooth Stone • Straw & Hide Bed • Support Beams • Thatch |
| Environment | Altitude • The Player • Calendar • Cobblestone • Logs • Mobs • Saplings • Seasons • Stone • Temperature • Trees |
| Food | Agriculture • Animal Husbandry • Berries • Fruit Trees |
| Materials | Charcoal • Coal • Double Ingots • Double Sheets • Flux • Gems • Gunpowder • Hides • Ingots • Leather • Lumber • Minerals • Pottery • Redstone/Powders • Sheets • Sticks • Straw • Unshaped Metal • Wool |
| Metalworking | Alloys • Anvils • Armor • Bellows • Blast Furnace • Bloomery • Tool Molds • Crucible • Forge • Gold Pan • Metals • Ores • Sluice |
| Tools & Weapons | Arrows • Axe • Buckets • Chisel • Firestarter • Flint & Steel • Hammer • Hoe • Javelin • Knife • Mace • Pickaxe • Prospector's Pick • Saw • Shovel • Sword • Scythe • Shears • Spindle |
| Other | Crafting Differences • Item Index |