Metalworking Guide
Contents
Casting Age (Copper & Bronzes)
Gathering Ore
As of Build 77, only one method exists to gain access to metals before you have made the metal tools needed for mining: collecting surface rocks and hoping to find Ore.
To make a single metal tool head you will need to collect 10 pieces of small, copper-bearing ore:
If you wish to make bronze tools, you can follow the alloy recipe and replace some of the copper ores with the following:
Smelting
Note: The Vessel can only smelt ores. If you have turned your metals into ingots, you will need to heat them in a forge to liquefy them, or use a Crucible if you plan on making alloys.
Copper
A Ceramic Vessel can be used to smelt Native Copper and Tetrahedrite nuggets into pure molten copper metal. To do this, fill the vessel with ore (stacks of different ores may be placed together in the same vessel) and then fire it in a kiln.
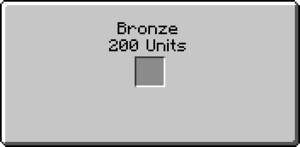
After the firing, retrieve the vessel from the kiln and right-click it to open up its GUI. You will see that now instead of the usual four slots the vessel has only one and contains text describing the amount of metal it contains. This metal will remain liquid for about 10 Minecraft hours, starting after the firing completes. If the metal inside solidifies, the GUI will not open and you must fire it in a pit kiln again to re-melt it.
Bronzes
A Ceramic Vessel can also be used to create Bronze, Black Bronze and Bismuth Bronze.
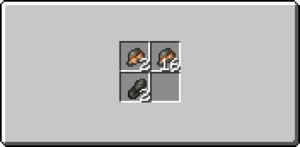
Before Firing: Place the necessary ores into a Ceramic Vessel, in the proper proportions for the desired type of bronze. For example, if you wanted to create normal Bronze then you would put copper ore (any combination of Native Copper or Tetrahedrite) and Cassiterite into the vessel. For each alloy there is a range of proportions which will produce the desired alloy so you don't have to hit an exact percentage, just be within the range.
After Firing: If you got the proportions right then when you right-click the vessel it will open up the same single-slot GUI as described above for smelting pure ores. You can then transfer the molten bronze metal to a Ceramic Mold in the same way. If you got the proportions wrong then when you right-click the vessel you'll get the four-slot storage GUI showing the raw ores still sitting in the vessel, unchanged.
Casting
Ceramic Molds can be used to transfer molten Copper or Bronzes from a Ceramic Vessel to a ceramic tool or weapon mold. To do so, completely fill the mold with molten metal.
|
Place an empty or partially filled Ceramic Mold into the slot to fill it with metal from the vessel. Note: Only rectangular Ceramic Molds can be filled in this way; you cannot directly fill a tool or weapon mold from a Ceramic Vessel. It takes 100 units of metal to completely fill an empty Ceramic Mold. The text in the vessel's GUI will be updated to show the amount of metal remaining in the vessel. |
Once the mold is full, right-click with it to open up its GUI. You will see an arrow with two slots to its left and one to its right. The leftmost slot will contain the filled mold. Place a single empty tool or weapon mold into the second slot on the left to begin the transfer. Once the transfer is complete the tool mold will move into the output slot and will show itself filled with metal.
All the recipes for tool and weapon molds can be found at the Clay Tool Molds page. ![]()

Retrieve the filled tool mold from the output slot and the now-empty Ceramic Mold from the second slot on the left. There is a chance that the Ceramic Mold will be broken and lost during this process.
Once the mold is full, place it into your crafting area and retrieve the finished tool or weapon head from the output. The mold will be destroyed in the process.
|
|
Anvils
In order to progress out of the Casting Age, you will first need to work your way up to a Tier 2 Anvil.
Stone
By using a hammer on the top of a raw Igneous stone block that is in its natural spawning layer, you will open the anvil GUI, where you can weld Copper Ingots into Double Ingots.
Copper
After you have obtained seven Copper Double Ingots, craft them into a Copper Anvil, where you can weld Bronze Ingots into Double Ingots.
Bronze
After you have obtained seven Bronze Double Ingots or seven Bismuth Bronze Double Ingots, craft them into an Anvil, where you can work Bronze Double Ingots into Sheets and weld Sheets into Double Sheets.
Iron Age
Gathering Ore
By now you should have a Pickaxe and a Prospector's Pick to use for finding and mining ore.
Smelting
Wrought Iron
Wrought Iron is obtained by working an Iron Bloom that has been created in a Bloomery.
| Input | Work Type | Output | Instruction |
|---|---|---|---|
| Hammer | Work on at least a Tier 2 anvil. | ||
| Hammer | For blooms over 100%. If starting bloom is under 200%, it will split in 1x 100% and 1x the remaining %. | ||
| Hammer | |||
| Melt | Melt refined iron bloom into wrought iron in the forge with a ceramic mold or crucible.
|
Pig Iron
Pig Iron is obtained by smelting the Iron Ore in a Blast Furnace.
Steel
| Input | Work Type | Output |
|---|---|---|
| Hammer | ||
| Hammer | ||
| Black Steel starts from the alloy recipe melted in a crucible. It will show as Weak Steel in the crucible. | ||
| Weld | ||
| Hammer | ||
| Blue/Red Steel start from the alloy recipe melted in a crucible. It will show as Weak Blue/Red Steel in the crucible. | ||
| Weld | ||
| Hammer | ||
Smithing
See Anvil page for the guidelines of smithing metal.
| Input | Work Type | Output | ||||||||||||
|---|---|---|---|---|---|---|---|---|---|---|---|---|---|---|
| Hammer with Plan |
| |||||||||||||
| Weld | File:Grid Gold Ingot 2x.png Double Ingot | |||||||||||||
| Hammer with Plan |
| |||||||||||||
| Hammer | ||||||||||||||
| Armor Process[1] |
| |||||||||||||
| Weld | ||||||||||||||
| Armor Process[1] |
| |||||||||||||
| Hammer |
| Navigation | |
|---|---|
| Construction | Barrels • Blueprints • Bricks • Firepit • Plank Blocks • Protection Meter • Quern • Smooth Stone • Straw & Hide Bed • Support Beams • Thatch |
| Environment | Altitude • The Player • Calendar • Cobblestone • Logs • Mobs • Saplings • Seasons • Stone • Temperature • Trees |
| Food | Agriculture • Animal Husbandry • Berries • Fruit Trees |
| Materials | Charcoal • Coal • Double Ingots • Double Sheets • Flux • Gems • Gunpowder • Hides • Ingots • Leather • Lumber • Minerals • Pottery • Redstone/Powders • Sheets • Sticks • Straw • Unshaped Metal • Wool |
| Metalworking | Alloys • Anvils • Armor • Bellows • Blast Furnace • Bloomery • Tool Molds • Crucible • Forge • Gold Pan • Metals • Ores • Sluice |
| Tools & Weapons | Arrows • Axe • Buckets • Chisel • Firestarter • Flint & Steel • Hammer • Hoe • Javelin • Knife • Mace • Pickaxe • Prospector's Pick • Saw • Shovel • Sword • Scythe • Shears • Spindle |
| Other | Crafting Differences • Item Index |